Manage my Flexone plan
1. Introduction
2. Putting a website online with Flexone
2.1. Adding the domain in Flexone
2.2. Setting up a subdomain with FLEXONE
2.3. FTP account creation
2.4. Publication of the site by FTP
3. Installation of a CMS (Wordpress, Joomla, etc.)
3.1. Automatic installation of the CMS
3.2. Manual installation of the CMS
4. Create an email address
5. Configuration of Flexone messaging
5.1. How do I manage my email addresses?
5.2. What is the DNS configuration to set up?
5.3. How to access the webmail ?
5.4. What settings should I use to configure my email software?
5.4.1 Outlook
5.4.2 Mail(Mac, Iphone, Ipad)
5.4.3 ThunderBird
5.4.4 Android
6. Create a database with Flexone
7. Configure SMTP for site forms
8. How to activate the SiteBuilder included in Flexone
9. How to install the Let's Encrypt SSL certificate in Flexone
1. Introduction
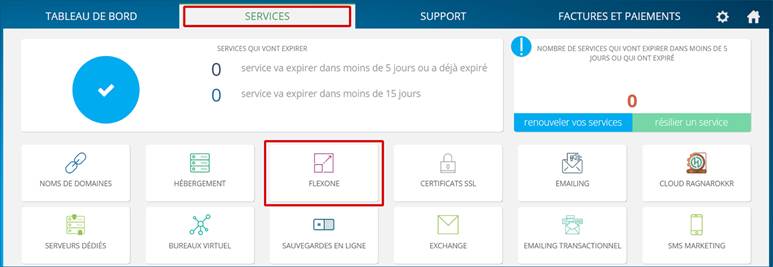
With Flexone, there is no external panel, everything is managed from your Customer Area: https://manager.hosteur.com/
Once connected, go to the Services section and then FLEXONE.

2. Putting a website online with Flexone
Putting your site online is done in 3 steps: adding the domain, creating the FTP account and publishing the site.
2.1. Adding the domain in Flexone
This first step will not be necessary for your first site. Indeed, when you placed your order, you chose the domain linked to the hosting, so it was automatically added to Flexone. In this case, you can go directly to the creation of the FTP account.
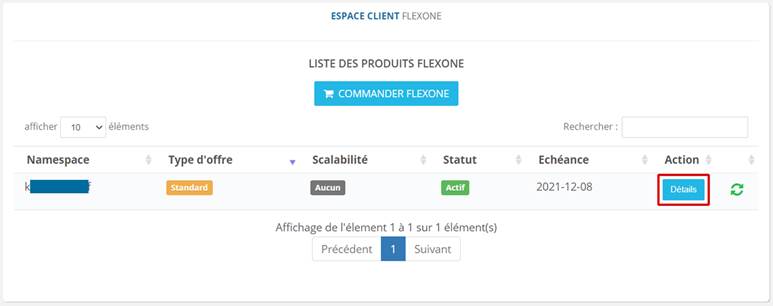
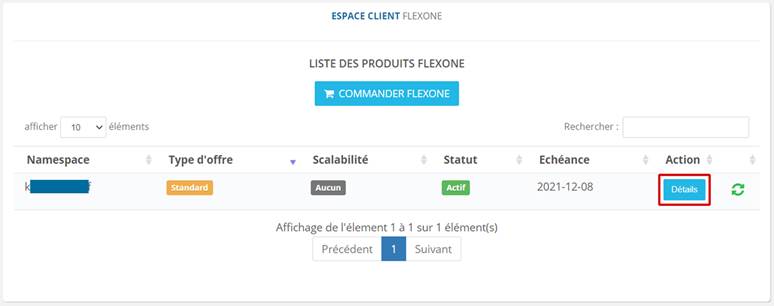
You must first add your domain in your Customer Area. Go to Services >> Flexone, click on Details.
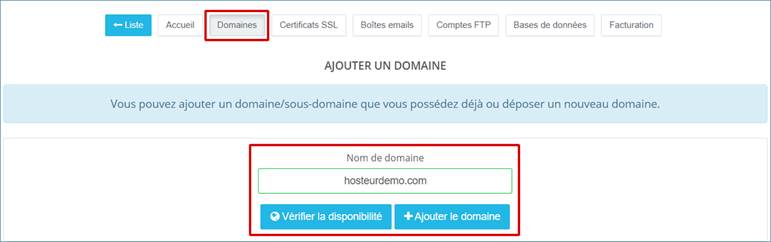
 Then go to the Domains tab and enter the domain name to add.
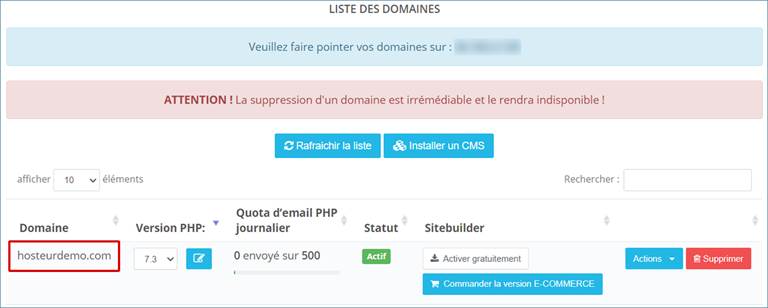
 As we specified above, you don't need to add your FIRST DOMAIN after placing the order for your Flexone. It will be automatically added, you can check it by looking at the bottom of the page, in the list of domains.
2.2 Configure a subdomain with FLEXONE
The steps for setting up a subdomain with Flexone are the same as for a domain: adding the subdomain, creating the FTP account and publishing.
In this document, we have already created and added the domain hosteurdemo.com in Flexone. You can also refer to our "Flexone Hosting Management" documentation.
1. Add the subdomain in Flexone
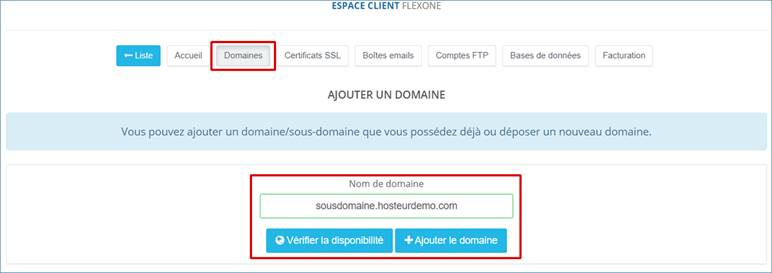
To add your subdomain, login to your Manager, then go to Services >> Flexone >> Details.
In the Domains tab, add your subdomain.
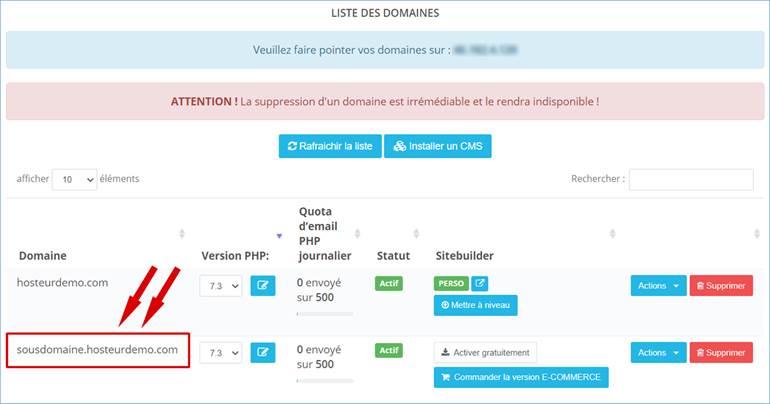
Once your subdomain has been added, it should appear in the list.
2. Create FTP account
After adding your subdomain, create the FTP account.
To do this, go to Services >> Flexone >> Details >> FTP Accounts.
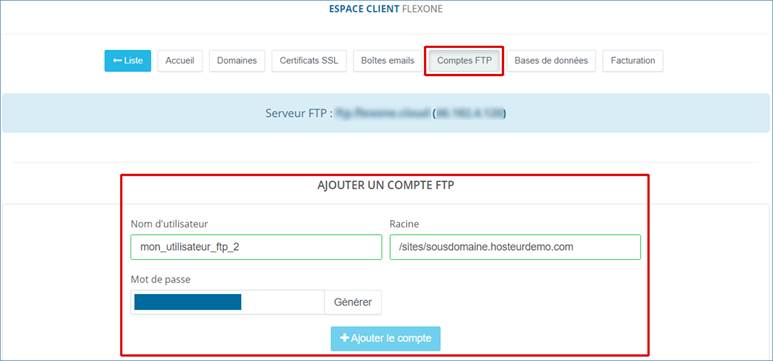
In our example, we put /sites/subdomain.hosteurdemo.com in the "Root" field. Our FTP account will point to this folder, which is the publishing directory of our subdomain.
The home page of our sub-domain (index.php or index.html) should therefore be placed in the /sites/sousdomaine.hosteurdemo.com.

3. Publish the site by FTP
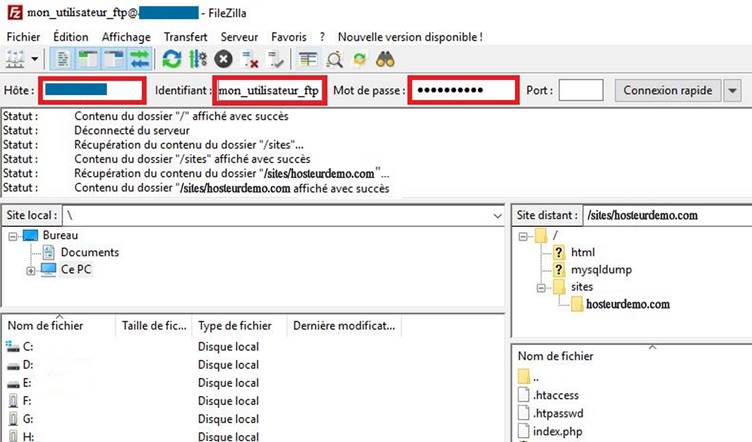
Publishing the site via FTP requires FTP client software such as Filezilla, which you can download here : https://filezilla-project.org/download.php?type=client
To connect to the server and publish your site, you will need the following information :
- FTP host : you will find it in your Customer Area, section Services >> Flexone >> Details >> FTP accounts

- FTP username : this is the username you put when you created the FTP account (in our example, it corresponds to my_user_ftp_2)
- FTP password: corresponds to the password you provided when creating the FTP account
- Port (optional): use port 21
Click on the Quick Connect button once you have completed these fields.
Then drag and drop your files from your computer (on the left) to the server (on the right), in the publication folder.
Notes :
Your domain linked to the subdomain must use the following DNS servers: dns1.hosteur.com & dns2.hosteur.com
It must point to the server Flexone (46.182.4.120).
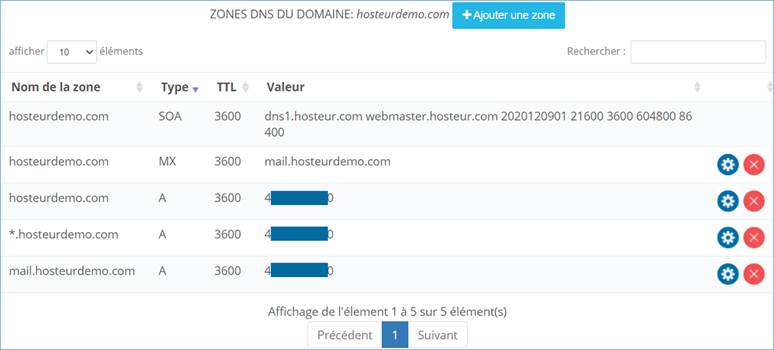
To see your subdomain's DNS zones, go to Services >> Domain Names >> My DNS zones and click on your subdomain.
Also read our "Domain Management" help.
2.3. FTP account creation
Once the domain is added, you must create your FTP account.
To create your FTP account, go to
Services >> Flexone >> Details >> FTP Accounts.
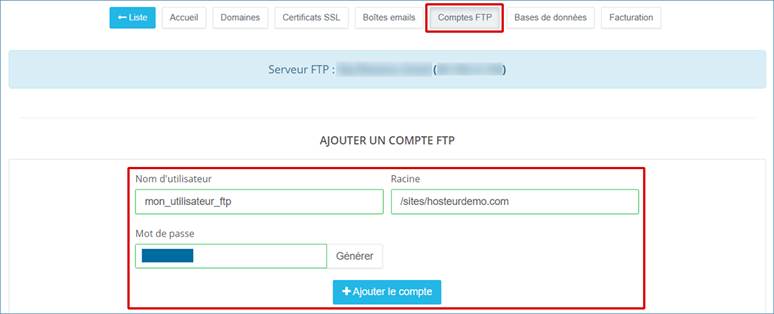 Note: the root corresponds to the path to the folder on which your FTP account will point. Example: /sites/hosteurdemo.com You can also put nothing or just a slash "/", but by connecting to the FTP, you will have access to all folders containing all your sites.
It is therefore preferable to make the root point to the folder of your site. In our example, the publication directory of our site will be : /sites/hosteurdemo.com
It is this folder that should contain the home page (index.php or index.html).

2.4. Publication of the site by FTP
All you have to do is publish your site via FTP. For this, you need an FTP client software.
You can download this software directly here : https://filezilla-project.org/download.php?type=client (Run the installation file, follow the steps and launch the software when the installation is complete).
You will then need 3 pieces of information to connect to the server and upload your site:
- The FTP host: this is the IP of the server where your site will be hosted (you will find this information in your Customer Area, Services >> Flexone >> Details >> FTP accounts)

- FTP Username : corresponds to the user you have previously created
- FTP Password : is the password of the user you have previously created
Note: the port to use is 21 (optional).
Then click on Quick Connect.
 All you have to do is drag and drop the files from your computer (left part) to the server (right part) in the publishing directory.
You also need to verify that your domain name uses Hosteur's DNS servers (dns1.hosteur.com and dns2.hosteur.com) and that your domain name points to the Flexone server.
To do this, in your Customer Area, you must go to Services >> Domain Names >> My DNS zones. Click on your domain name. You will then see the DNS zones of your domain.
 For more information on this subject, please read the document "Managing your domains".
3. Installation of a CMS (Wordpress, Joomla, Prestashop, etc)
To install your CMS, you have 2 options:
- Proceed with the automatic installation
- Do the installation manually
3.1. Automatic installation of the CMS
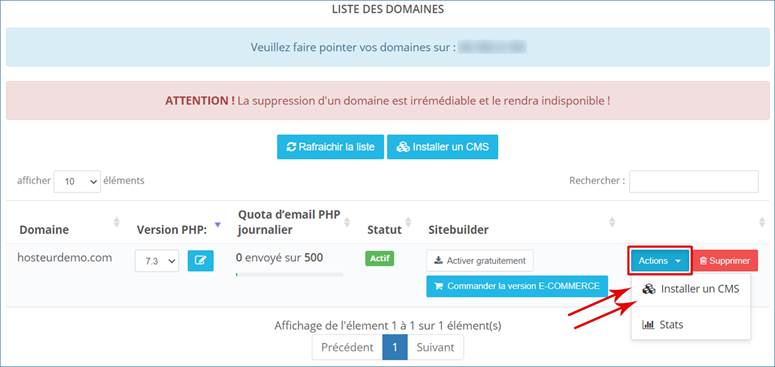
Go to your Manager >> Services >> Flexone >> Details >> Domains and click on Install CMS.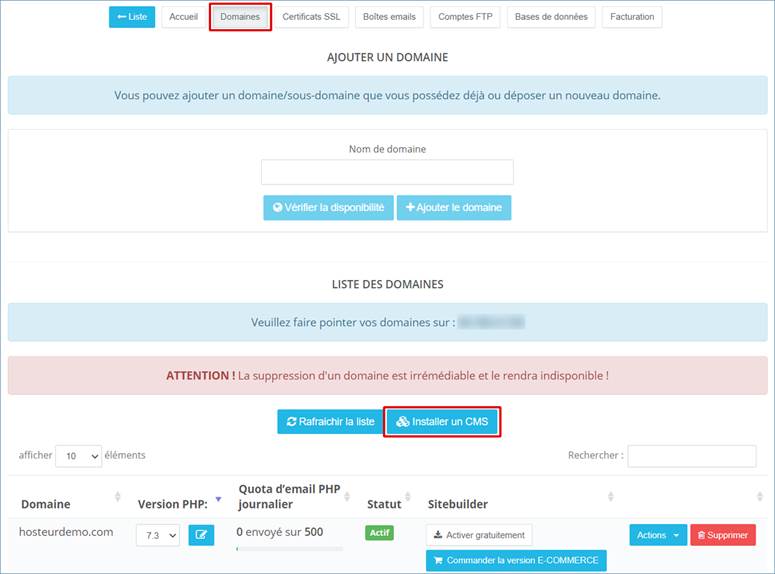 Note: You can also find the Install CMS option by clicking on Actions in the list of your domains.
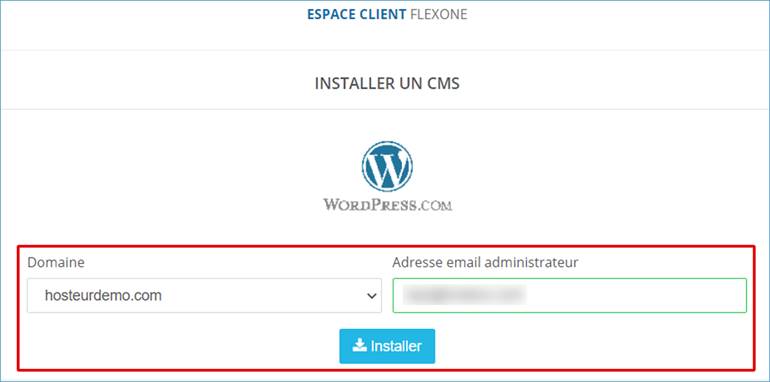
Choose the CMS you want and click on Install. Please note that the default login credentials of your CMS are displayed on this page, you will need them for the first connection to the backoffice, you can change them later.
Select the domain in the drop-down list, enter your email address and click on Install.
 The installation of your CMS will be done automatically, you will have to wait a few minutes and can already start the design of your site.
3.2. Manual CMS installation
Here are the steps to follow to manually install your CMS :
1) Download and extract the CMS archive files from the official website
2) Transfer to your FTP the CMS files in the publishing directory
3) Create your database from your Customer Area >> Services >> Flexone >> Details >> Databases
4) Launch the installation of the CMS by going to the url of your site and following the different steps
4. Creating an email address
From your Customer Area, please go to Services >> Flexone >> Details >> Mailboxes. Then fill in the required information and click on Add Box.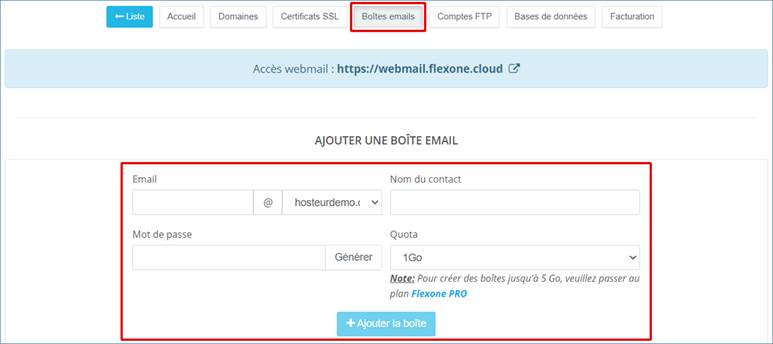
5. Configuration of Flexone messaging
5.1. How do I manage my email addresses?
Whether it is for the creation, modification or deletion of an email address, everything is managed directly in your customer area: https://manager.hosteur.com
All you have to do is go to the Services >> Flexone >> Details >> Email boxes. You will access the form for creating an email address as well as the list of boxes created.
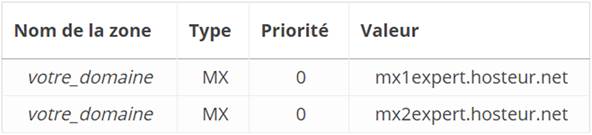
5.2. What is the DNS configuration to set up?
5.3. How to access the webmail ?
The webmail is accessible at the following address : https://webmail.flexone.cloud
5.4. What settings should I use to configure my email program?
5.4.1. Outlook
For incoming parameters :
- Type of configuration : IMAP
- Incoming Server : mail.flexone.cloud
- Port : 993
- SSL : SSL
For outgoing parameters :
- Type of configuration : SMTP
- Outgoing server : mail.flexone.cloud
- Port : 587
- This server requires authentication
Normal password authentication - Authentication method : TLS
It is also possible to use the POP configuration, here are the parameters:
- Type of configuration : POP
- Incoming Server : mail.flexone.cloud
- Port : 995
- SSL : SSL
5.4.2. Mail on Mac, Iphone, Ipad
Go to "Settings" then "Add an account".
Select the type of account "Other" then "Add a mail account".
Enter the name of the mailbox, the email address, the password and the description you want.
Click on "Next".
You will then have to indicate the information on the incoming and outgoing server:
Please indicate for both:
Host name: mail.flexone.cloud
Also specify your email address and password for incoming and outgoing mail.
(even if it is indicated that it is optional)
Once you have found the settings click on "Save". Your account is now configured.
5.4.3. Thunderbird
Open ThunderBird, right click in the empty area (left column) then "Settings".
Then go to "Account management" then "Add an email account".
Enter your name, your email address and your password.
Then click on "Configure manually".
Complete the following information :
INCOMING :
Protocol : IMAP
Server : mail.flexone.cloud
Port : 993
SSL : SSL/TLS
Authentication : Mot de passe normal
Login : votre_adresse_mail
OUTGOING :
Protocol : SMTP
Server : mail.flexone.cloud
Port : 587
SSL : STARTTLS
Authentication : Mot de passe normal: Mot de passe normal
Login : votre_adresse_mail
Then click on "Finish".
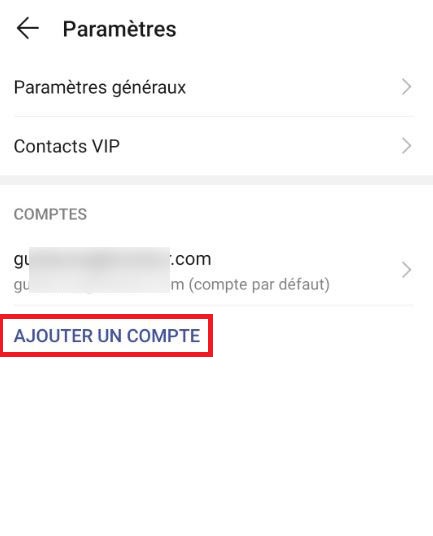
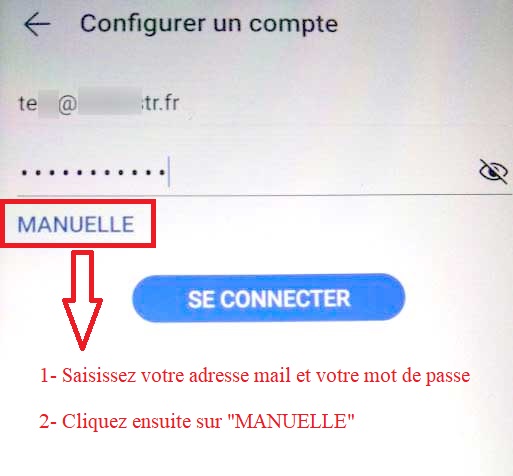
5.4.4. Android
Go to the settings of your Android device, then "Accounts & users", then go to "Email", "Account settings" and "Add an account":
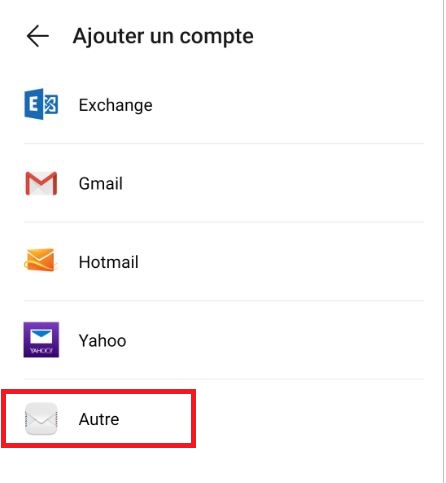
Choose "Other" as your account type:
Enter the email address to be configured and the password then click on "MANUAL" :
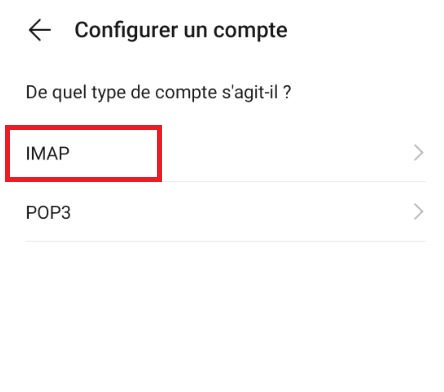
Choose IMAP :
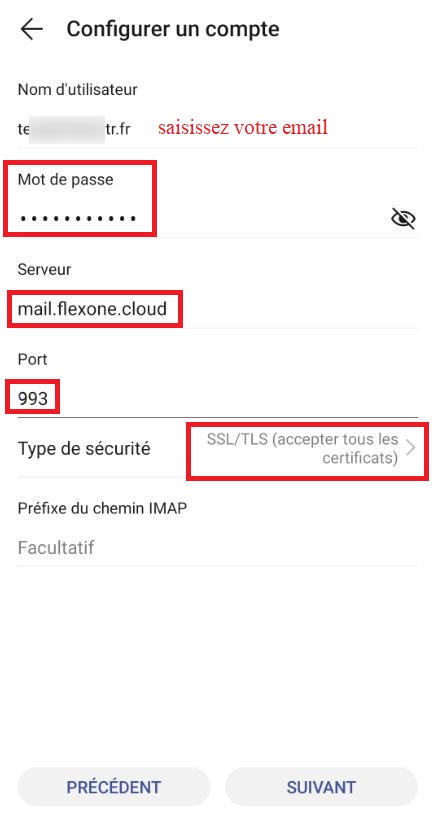
Enter the information for incoming mail as follows:
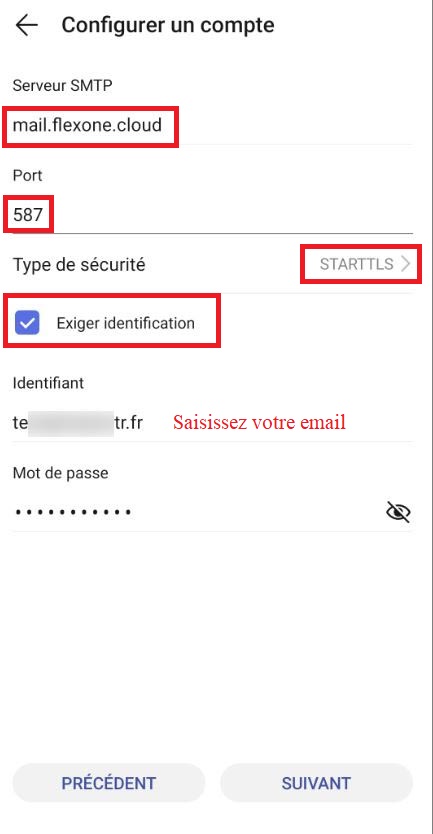
Enter the following information for outgoing mail:
6. Creating a database with Flexone
Go to your Customer Area, Services >> Flexone >> Details >> Databases and fill in the required informations.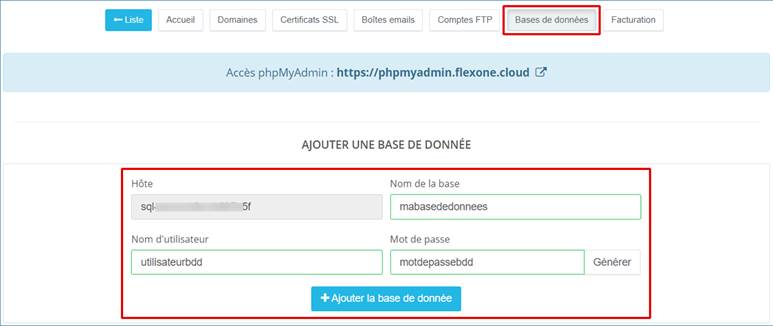 Once your database is created, you will see it appear in the list of databases at the bottom of the page.
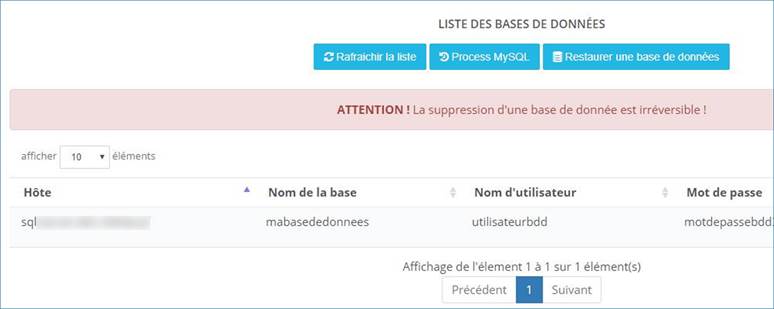 At the level of your website, your configuration file should contain the database information. The database server (host) to use is indicated in this same section. On the right hand side you will find a "Modify" button to change the password for this database and a "Delete" button to delete the database.
7. SMTP configuration for site forms
To configure the sending of emails from the form on your site, you must enter the following parameters:- Type of configuration : SMTP
- SMTP server : mail.flexone.cloud
- Port : 587
- Security: STARTTLS
- Username : your email address
- Password : the password of your mailbox
8. How to activate the Site Builder included in Flexone
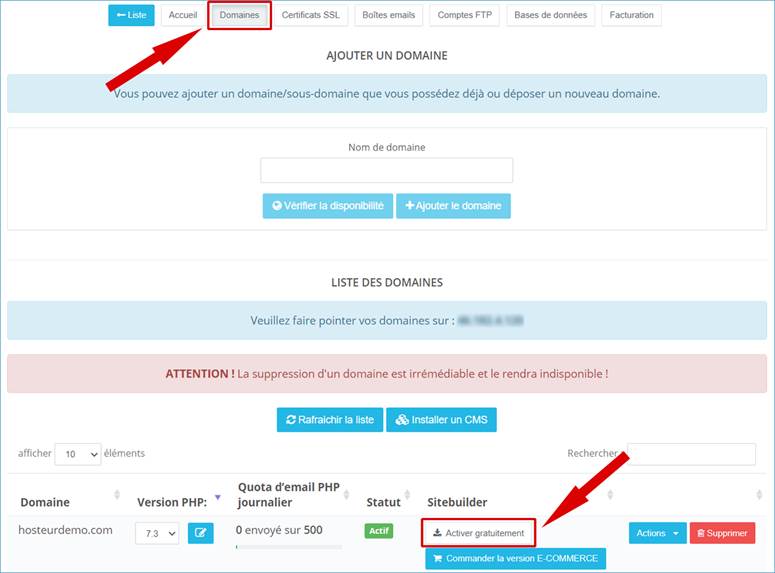
Our site builder "CLICK", included in our Flexone hosting, could be very useful for you, especially if you have no experience in creating a website. However, you need to activate it. 1. First of all, you need to log in to your Customer Area and go to SERVICES >> FLEXONE.
To go directly to the login page, type https://manager.hosteur.com/ in the URL bar of your browser.
 2. Then click on Details.
 3. Go to the Domains tab and click on the Activate for free button that is located in the Sitebuilder column of your domain.
A message will appear saying that the Site Builder has been activated on your domain.
4. Now click on the blue button with an arrow, which is always in the Sitebuilder column.
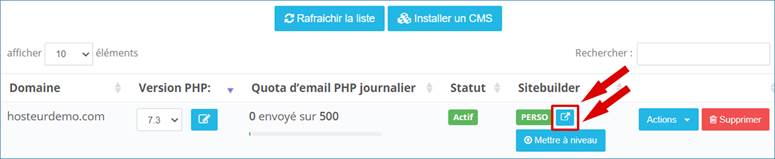 Our Site Builder CLICK page will open and you can start creating your website. Various templates are available to you.
The following documents will help you in using the Site Builder to create your site:
- https://www.hosteur.com/ressources/articles/premiers-pas-site-builder-hosteur
- https://site.pro/fr/FAQ/
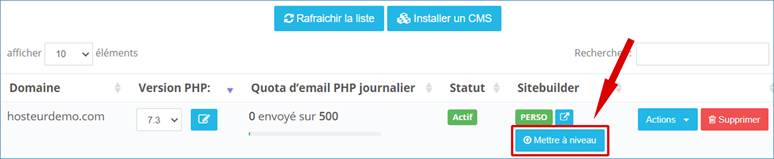 In the page that opens (options and additional resources available), check the e-commerce sitebuilder option and click on the Order button.

9. How to install the Let's Encrypt SSL certificate in Flexone
The Let's Encrypt SSL certificate is included in our FLEXONE hosting offer, so it is free. However, you need to install it.
Note : 1 SSL = 1 domain
An SSL certificate can only be installed on one site (domain name). For example, if you have 3 domain names, you will need to install 3 Let's Encrypt SSL certificates.
Here are the steps to follow to install your Let's Encrypt.
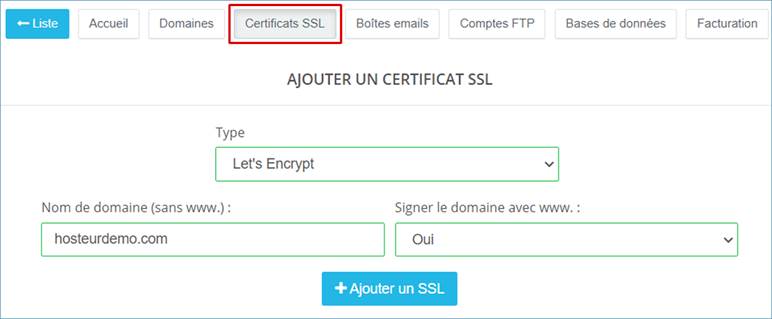
1. Go to your Customer Area (the login page is here :https://manager.hosteur.com/), rubrique « Services » and « Flexone ».

2. Click on « Details ».

3. Go to « SSL Certificates ».
Complete the form by choosing Let's Encrypt as your certificate type.
Enter the domain name WITHOUT the 3 "w" and choose whether or not you want to sign the domain with www.
Finally, click on "Add SSL".
Wait a few minutes and your free Let's Encrypt SSL will be set up.
(Sometimes the installation time for free certificates can be longer)
Note :
We still recommend that you get a "real" SSL certificate for a better security of your website. See our offers here: https://www.hosteur.com/securite/ssl
Once you have placed your order, our team will take care of the installation of your SSL certificate.